1. Introduction

Impresser はオーディオ業界では良く知られている、最も柔軟で強力な鋭さを両立したコンプレッサーをモデルにしています。そのサウンドは、独特のアナログデザインと非常に特殊な機能によるものです。Impresser はビンテージコンプレッサーの優位性を保ちながら、より広範囲のコントロールオプションを備えています。強力な Antelope Audio の FPGA エンジンにより再現されたビンテージユニットは、これらを全て処理できます。Impresser は滑らかで温かみのあるコンプレッションをトラックに追加したり、オーディオを積極的に変化させることも可能です。

Impresser は独自の倍音歪を追加することが出来ます。これは絶妙なチューブ歪みやテープサチュレーターの代わりになります。Impresser は信号を圧縮しているかどうかにかかわらず、この機能を使用できます。ハイパスフィルターとバンドパスサイドチェーンフィルターで調整可能な周波数を設定でき、Impresser が圧縮する周波数のコントロールが可能です。すべての他のAntelope Audio FPGA コンプレッサーモデルと同様に、Impresser はモノラル、ステレオで使用できます。

2. Features & Specifications

Features

  • 最先端仕様とパフォーマンスを備えたクラシックサウンド
  • 3つのオーディオモードで、チューブやテープのような質感を再現、ユーザーがプログラム可能な暖かなハーモニックな歪み。
  • ハイパスとバンドパスノブを備えたビルトインのサイドチェーン EQ で、ローエンドの余分なトリミングや過酷なスパイクの防止に役立ちます。
  • 8つの異なる比率とそれに関連する圧縮曲線、1:1 から低次高調波でオーディオを穏やかに圧縮、”Nuke” は brick wall limiter になります。
  • ステレオリンクモードでは、歪みや音楽性がさらに加わります。
  • 従来のオプトコンプレッサーの音をシミュレートするための専用回路。
  • UK モードでは、すべてのボタンを押し込んだ 1176LN の独特のサウンドを得ることができます。
  • 簡単で直感的な操作。

Original Hardware Specifications

Freq. response
2 Hz to 160 kHz in clean audio mode (+0, -3 dB).

Dynamic range
110 dB from max. output to min. output in 1:1 mode. Greater than 100 dB signal to noise in distort 3 mode.

Distortion
Ranges between .02% and 20% depending on distortion mode and release times.

Attack Range
50uS – 30mS

Release range
.05 sec to 3.5 seconds *

* Release goes up to 20 seconds in 10:1 “Opto” mode.

3. Quick Start

  1. Load the Impresser on the desired audio channel.
  2. Set the ratio to 6:1.
  3. Set the Input, Attack, Release, and Output knobs to midway position.
  4. Adjust the Input knob to drive the compressor harder.
  5. Switch to a higher ratio if you think you need more evident compression.

Note: Cycling through the 1:1 ratio while compressing audio may result in the signal quickly reaching its peak input level and possibly becoming dangerously loud. It is best to skip past the 1:1 ratio setting as quickly as you can, or wait for pauses in the signal while switching ratios.

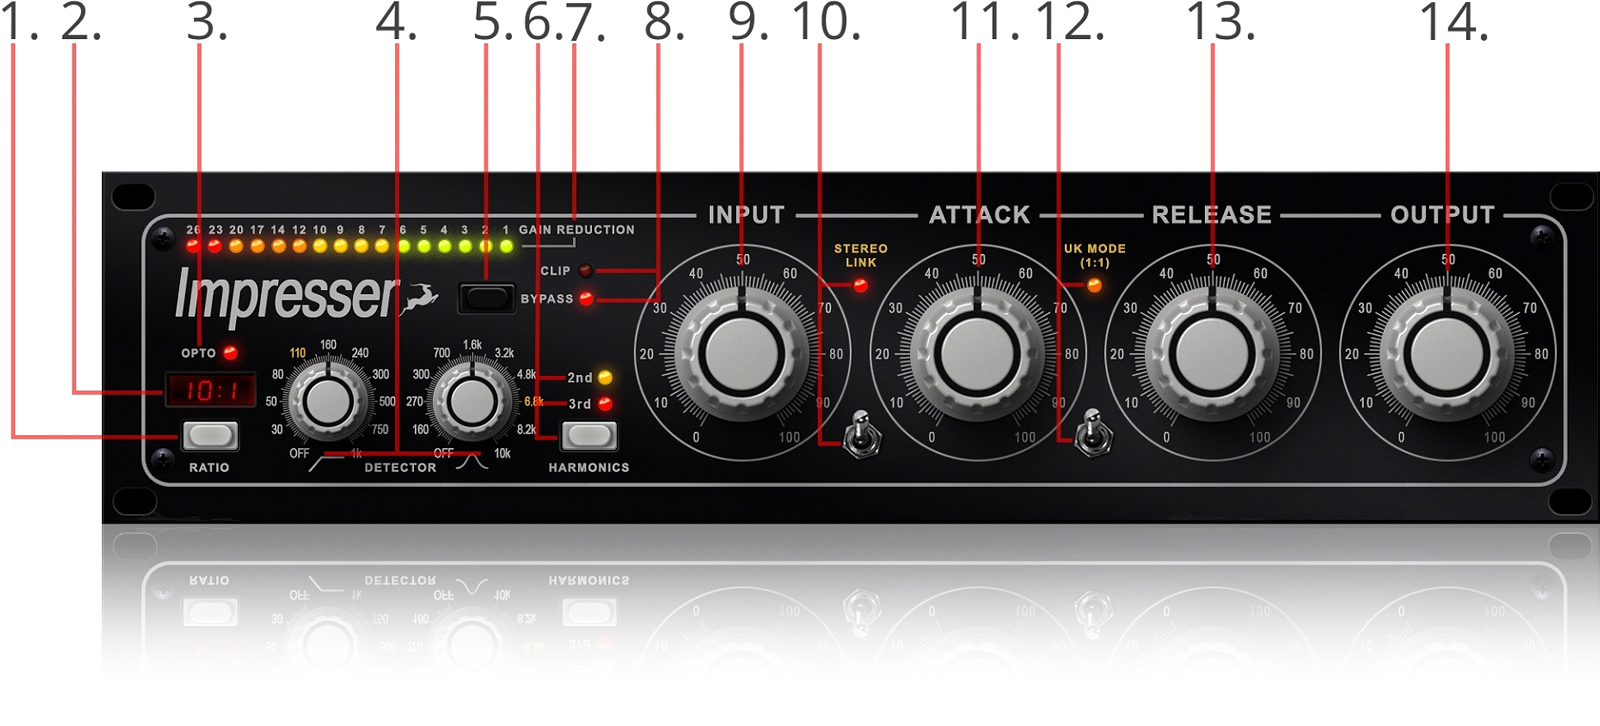
4. Layout

impresser specs

1. Ratio Button (レシオ・圧縮比率ボタン)

使用可能な圧縮率でサイクルします。 1:1, 2:1, 3:1, 4:1, 6:1 10:1, 20:1 と Nuke があります。 10:1 ではオプトコンプが自動的に有効になります。

2. Ratio Indicator (レシオインジゲーター)

現在選択されている圧縮率を表示します。

3. Opto Indicator (オプトインジゲーター)

Impressor がオプトモードで動作しているときに点灯します。

4. Sidechain Frequency Knobs (サイドチェーン周波数)

⦁ Sidechain Frequency Knob (High-Pass) ハイパス設定
このノブはハイパスサイドチェインフィルターを調整します。余分なローエンドを除去し、コンプレッサーが低域を過剰圧縮するのを防ぎます。

⦁ Sidechain Frequency Knob (Band-Pass) バンドパス設定
このノブはバンドパスのサイドチェインフィルターを調整します。

5. Bypass Button (バイパスボタン)

Impresser をバイパスします。

6. Harmonics Button (倍音ボタン)

ハードウェアオリジナルの有名なディストーションモードを採用しています。”2nd” モードでは2次倍音 (オクターブ) が強調され、暖かみのある音が得られます。 “3rd” モードは3次倍音を強調し、VCA 出力レベルを上げ、信号のトップ・ボトムピークを平坦化します。 アナログテープのサチュレーションに似た効果が得られます。

7. Gain Reduction Meter (ゲインリダクションメータ)

ゲインリダクション (dB 単位) を表示します。 LED が左に動くほど圧縮が多くなります。

8. Clip & Bypass LEDs (クリップ・バイパス表示)

⦁ Clip LED
クリッピングが発生した場合に点灯します。

⦁ Bypass LED
Impresser がバイパスされると点灯します。

9. Input Gain Knob (インプットゲイン)

入力ゲインと連動してスレッショルドを調節します。 スレッショルドのモディフィケーションレベルは比率設定に関連しています。

10. Stereo Link Switch & LED (ステレオリンクスイッチ & LED)

ステレオリンクをオンまたはオフにします。 ステレオリンクがオンになると、LED が点灯します。

11. Attack Knob (アタックタイム)

入力信号がスレッショルド値に達して圧縮に掛かるまでの時間 (マイクロ秒またはミリ秒) を設定します。 アタックタイムは 50μ sec から 30m sec まで設定出来ます。 より速いアタックタイムは、コンプレッサーはより積極的に動作します。 ノブを 0 の値に設定すると、最も早いアタックタイムが得られます。

12. UK Mode Switch & LED (UK モードスイッチ & LED)

UREI 1176LN リミッターのすっきりとしたサウンドをエミュレートします。UK モードはすべての比率で動作しますが、オリジナルの 1176LN を特徴を保持するには、アタックを 3 以下に設定する必要があります。これ以上高くなると歪みが発生します。

13. Release Knob (リリースタイム)

信号がスレッショルドを下回ってからコンプレッサーが外れるまでの時間を設定します。リリース時間は 50μ sec から 3 sec の範囲です。最も速いリリース時間は、コントロールを 0 に設定します。

14. Output Knob (アウトプット)

Impresser の出力段で信号レベルを調整し、ゲインを上げたり下げたりすることができます。

5. Ratios Explained

The selectable ratios offer a variety of compression curves, letting you sculpt the sound in perfect harmony with your audio.

1:1
Saturate and warm up your audio without applying compression.

2:1 – 3:1
Gentle compression with +15 to +30dB parabolic-shaped knee.

4:1 – 6:1
This is where you can really hear the Impresser doing its work. A 6:1 ratio with all knobs set midway is the recommended starting point for compressing just about any instrument or vocal.

10:1
Puts the Impresser in Opto mode, engaging dedicated circuitry to emulate the character of classic optical compressors.

20:1 – NUKE
Warning — here be dragons! At these settings, Impresser becomes a hard limiter that’s ready to crush or expand any sound – especially room mics.

6. Distortion Tips

The Impresser distortion modes are designed for subtle analog distortion. Engaging “2nd Harmonics” gives out “Class A” tube-like warmth, producing 2nd-order harmonics when compressing. Likewise, “3rd Harmonics” adds both 2nd and 3rd order harmonics for a sound similar to tape distortion.

To obtain analog tape saturation, set the ratio to 2:1, turn on 3rd Harmonics, and add about 3db of gain reduction. Use fast attack and release times. Try a higher ratio and more gain reduction to emulate over-saturated tape.

Bear in mind that going over 5dB of gain reduction will sound less like tape and more like compression!

7. Starting Points For Different Instruments

Here are some example settings for treating different instruments with the Impresser!

7.1 Vocals – Standard
Ratio: 6:1
Attack: 5
Release: 4
Apply 3dB to 17dB gain reduction

7.2 Vocals – Classic Compression
Ratio: 10:1 (Opto mode)
Attack: 10
Release: 0

7.3 Vocals – Aggressive Compression
Ratio: 6:1
Attack: 2.5 to 3.5
Release: 0 to 2
2nd Harmonics engaged
Apply 17dB to 20dB of gain reduction, which will be felt on louder passages only

7.4 Bass
Ratio: 4:1 to 6:1
Attack: 5
Release: 4
Use fast attack and release times to keep clacking sounds from pumping. Apply liberal gain reduction.
Try Opto mode

7.5 Electric Guitar
Start with a ratio of 6:1 and all knobs at noon. From there, apply fast attack and medium release times to smooth out the pick attack. To get rid of harshness in solos, play with the band-pass filter control to bring forth softer notes and sustain higher notes. Feel free to try Opto mode as well.

7.6 Acoustic Guitar
Ratio: 6:1
Input: 7
Attack: 2
Release: 5
Output: 7

7.7 Piano/Keys
Ratio: 6:1
Input: 5
Attack: 5
Release: 5
Output: 5

Start with these neutral settings, then lower the attack and try slightly increasing the release. Opto mode sounds good on piano, too.

7.8 Drums – Snare, Kicks, Toms
Ratio: 3:1 to 6:1
Input: 6
Attack: 5
Release: 5
Output: 6

⦁ Short release times bring out drum decay.
⦁ If crackling occurs, try longer attack and release times.
⦁ Try Opto mode for kick drums, with Attack on 10 and Release on 0.

7.9 Drums – Room Mics
Ratio: 20:1 or Nuke
Input: 10
Attack: 6
Release: 2.5
Output: 6

For a John Bonham type of larger-than-life sound, try setting Attack to 5, Release to 3, and applying up to 20dB of gain reduction. Feel free to add some grit with the 2nd and 3rd harmonics distortion as well.

8. Emulating Classic Compressors

The versatile architecture of Impresser enables convincing emulation of nearly all classic compressor designs. Here’s how to get Impresser to take on the personalities of some well-known units!

8.1 Opto (LA-2A, LA-3A, LA-4A)
Switch to 10:1 ratio and adjust the Attack to 10, Release to 0, Input and Output to taste. Attack settings above 4 keep the opto feel. Faster attack times provide a more aggressive sound. Adding 2nd and 3rd Harmonics to the concoction gives out a tube-like character.

8.2 Over E-Z Type Sound
Set ratio between 2:1 to 6:1, Attack to 9, Release to 2. Don’t use distortion.

8.3 1176LN Feel
Set the ratio between 3:1, 4:1. 6:1, and 20:1 to simulate the 1176LN’s original four ratios. Set the Attack 0 to 3.5, Release 1 to 10.5, and don’t use distortion. Keep the Attack below 4, as the 1176LN has extremely fast attack times.

8.4 Fairchild IGFET
Set ratio to 6:1, Attack between 3 and 5, Release between 2 to 7. Keeping Attack and Release at 4 is a good starting point.

9. Contacts

Having difficulties with the Impresser or anything else Antelope? Get in touch with us by the following means:

European Direct Support Line
+44 2039578550
10:00 a.m. – 10:00 p.m. (EET), Monday – Friday

USA Direct Support Line
+1 734 418 8661
7:00 a.m. – 6:30 p.m. (EST), Monday – Friday

Online (live chat and e-mail)
Antelope Audio Support Page

10. Glossary

Attack: Adjusts how quickly the compressor starts to work after the signal exceeds the compression threshold.

Release: Controls how soon the compressor will stop after the signal goes below the compression threshold.

Ratio: Controls how much compression is applied. For example, a 3:1 ratio means that every time the input signal crosses the threshold by 3dB, output signal will be attenuated 1dB.

Threshold: The Threshold is the level above which the compressor considers the signal too loud and starts applying compression.

Knee: Knee and Attack have a lot in common, but they are not the same. Like Attack, Knee controls how the compressor will react once input signal passes the threshold. Hard Attack makes the compressor engage immediately while Soft Knee shapes its attack time to make it slower and smoother.

Opto (optical) Compression: The main influence over how a compressor sounds is the gain control element. This can be a tube, a FET (field effect transistor), a VCA (voltage-controlled amplifier), a digital processor, or an optical photocell (a light source and light detector). Opto compressors are based on the latter. A typical characteristic of theirs is non-linearity, which results in a very distinct sonic character.

Thus, transparent compression is not usually their forte – although there are modern designs that come close to VCA compressors’ precision. But that’s certainly not what the Opto mode on the Impresser is going after! Rather, it nails the larger-than-life sound of classic opto compressors like the LA-2A, 3-A, and 4-A. You can hear these on countless records, often used to add presence and warmth to vocals.