1. Introduction

FET-based compression has been a staple in the studio since its invention in the late ’60s. The Antelope Audio FET-A76 captures all the subtleties and nuances of a vintage FET compressor. Just like its analog progenitor, it’s useful not only for controlling dynamics and sculpting tone, but also for its ability to add punch and presence to anything passing through its circuits.

Mirroring the original hardware’s simplified and intuitive interface, the FET-A76 features Input & Output gain controls and a selectable 4-way ratio control with an additional “all-buttons-in” mode for an aggressive compression character.

The FET-A76 shines in a wide range of applications — from vocals, to bass guitar, to bus compression. It’s a powerful companion to Antelope Audio’s FPGA EQ models, such as the BAE-1073 EQ.

2. Features

  • Vintage FET (Field Effect Transistor)-based compression and limiting.
  • Versatile and powerful, suitable for a wide range of instruments and vocals.
  • “All-buttons-in” mode allows drastic and aggressive compression.
  • Simple and intuitive interface.

3. Original Hardware Specifications

Frequency Response
20Hz to 20kHz (+/- 1dB)

Gain
45dB (+/- 1dB)

Distortion
> 0.5% Total Harmonic Distortion from 50Hz to 15kHz with limiting, at 1.1 seconds release setting

Signal-to-Noise Ratio
> 81dB with input signal at threshold of limiting over a 30Hz to 18kHz bandwidth

Attack Time
Adjustable from 20 to 800 microseconds

Release Time
Adjustable from 50 milliseconds to 1.1 seconds

4. Layout

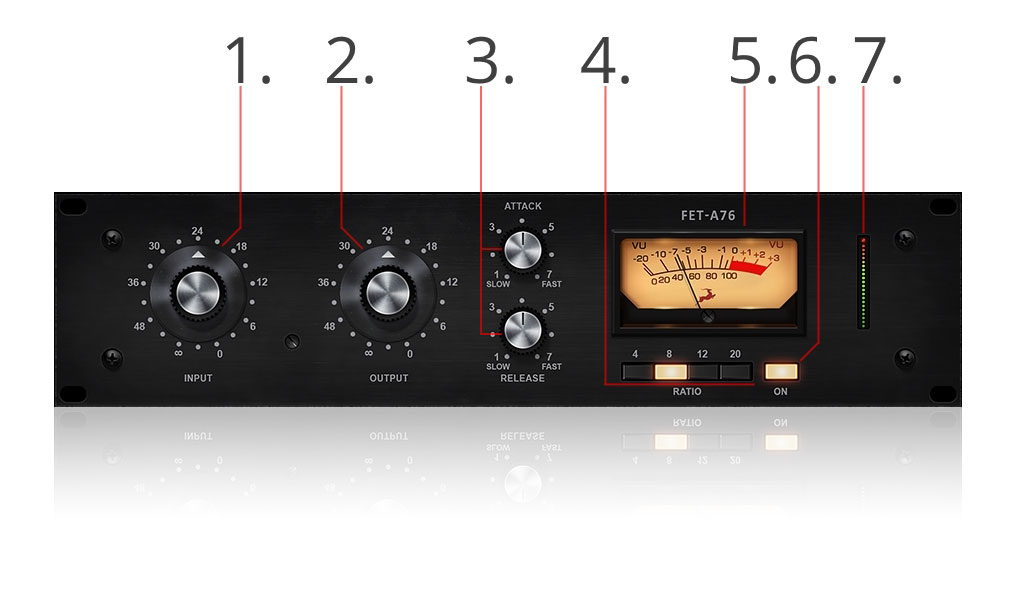
FET A76 Layout

1. Input Control

Controls the input level for the first variable gain stage – the “drive” for the compressor. To obtain unity gain, set the Input and Output Level controls at their two o’clock positions.

2. Output Control

The Threshold control sets the level at which compression sets in. Turning it counter-clockwise selects a lower start point, which brings out more compression. Turned fully clockwise, the control stops compression.

The Ratio knob controls the amount of compression of the signal which exceeds the threshold value. Setting this control fully counter-clockwise deactivates compression.

3. Attack & Release Controls

Visualizes the gain reduction occuring as the result of compression.

A. The Attack control

It adjusts the length of time it takes the FET-A76 to respond to a signal and begin gain reduction. The Attack time can vary between 20 microseconds to 800 microseconds. It is at its fastest when the knob is in the fully clockwise position, and slowest when it’s fully counterclockwise.

Turning the Attack knob all the way to the Off position disables compression altogether — although the signal still passes through the FET-A76 and gets “colored” musically.

With fast attack times, gain reduction is engaged almost immediately after the signal reaches the compression threshold. Short transients are caught by the compressor and reduced in level, thus the sound becomes softened. With slower attack times, these transients will pass through unaffected before limiting or compression occurs.

B. Release Control

Adjusts the length of time it takes the compressor to return to its initial level after compressing the signal. The release time is adjustable between 50 milliseconds and 1100 milliseconds (that’s 1.1 seconds). The Release time is at its fastest when the knob is in its fully clockwise position, and slowest when in the fully counterclockwise position.

How to set the Release time? Consider these hints. If the Release time is too fast, “pumping” and “breathing” artifacts may occur. Set it too slow, and loud sections may cause persistent gain reduction throughout soft sections, making them hard to hear.

4. Ratio Buttons

Choose the compression ratio. The available options are 4:1, 8:1, 12:1, and 20:1. At the latter two ratios, the FET-A76 is limiting audio instead of compressing it. Higher ratio settings also set the signal threshold higher.

Hold down Ctrl (or Command on Mac) and click to press multiple ratio buttons and obtain the aggressive “all buttons pushed in” sound — great for beefing up a drum bus or ambiance and room mics with parallel processing, for example.

5. Gain Reduction Meter

Visualizes the gain reduction occurring as the result of compression.

6. Power On/Off Button

Turns the compressor On or bypasses it. The button doubles as the BP button in the AFX Rack.

7. Output Gain Meter

Visualizes the output signal level.

5. Quick Start

  1. Start by setting the Input and Output knobs to their 12 o’clock positions (unity gain).
  2. Set the Attack and Release controls to their 12 o’clock positions (at approximately “4”). Some gain reduction will occur.
  3. Slowly turn the Input control clockwise until the desired amount of gain reduction is achieved.
  4. Adjust the Attack & Release times until they sound suitable for your material.
  5. Raise the Output level to make up for lost gain.

6. Contacts

Having difficulties with the FET-A76 or anything else Antelope? Get in touch with us by the following means:

European Direct Support Line
+44 2039578550
10:00 a.m. – 10:00 p.m. (EET), Monday – Friday
USA Direct Support Line
+1 734 418 8661
7:00 a.m. – 6:30 p.m. (EST), Monday – Friday
Online (live chat and e-mail)
Antelope Audio Support Page

7. Glossary

Attack
Adjusts how quickly the compressor starts to work after the signal exceeds the compression threshold.
Release
Controls how soon the compressor will stop after the signal goes below the compression threshold.
Ratio
Controls how much compression is applied. For example, a 3:1 ratio means that every time the input signal crosses the threshold by 3dB, output signal will be attenuated 1dB.
Threshold
The Threshold is the level above which the compressor considers the signal too loud and starts applying compression.
Knee
Knee and Attack have a lot in common, but they are not the same. Like Attack, Knee controls how the compressor will react once input signal passes the threshold. Hard Attack makes the compressor engage immediately while Soft Knee shapes its attack time to make it slower and smoother.