1. Introduction

The hardware original behind Tube176 owes its sound to a unique variable-mu dual triode tube which is long out of production. Now this cult studio piece is brought back to life in the FPGA realm as a powerful, fast compressor, which can be used on everything — vocals, guitar solos, bass lines, drums, or even a full mix. Able to smooth the sound or completely flatten it when pushed real hard, Tube176 makes drum transients shine and boosts vocals through a busy mix.

2. Features

  • Quintessential vintage tube compression and limiting.
  • User-friendly controls.
  • Enhances dimension, depth, and detail.
  • Adjusts tone in a way equalization cannot.

3. Original Hardware Specifications

Frequency Response
Flat within 0.5 dB from 20-20,000 Hz.

Harmonic Distortion
Below 1% from 20-20,000 Hz at 0-15 dB Gain Reduction

Noise Level
Greater than 76 dB below normal operating level

Gain Reduction
20 dB of available gain reduction

Maximum Gain
32 dB with input and output controls set maximum

Minimum Input Level
–26 dBm at 2:1 ratio
–12 dBm at 12:1 ratio

Normal Operating Level
+4 dBm

4. Layout

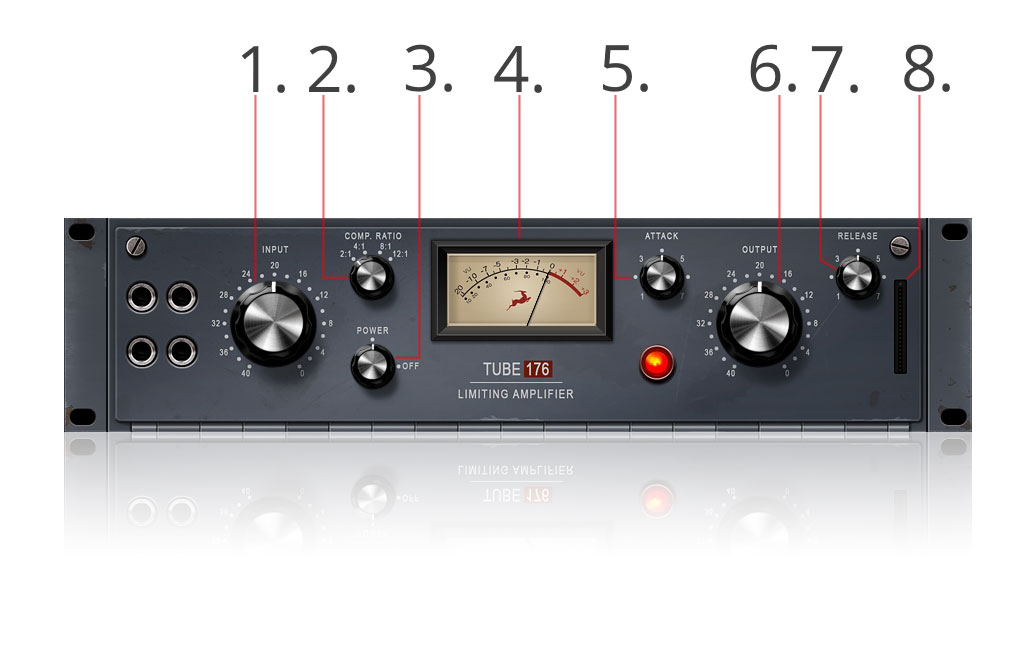
Tube176 layout 1

1. Input Level Control

As the Tube176 has a fixed threshold, gain reduction is adjusted by the Input Level Control. The input is optimised to provide 0 to 20dB of gain reduction.

2. Compression Ratio Control

Adjusts the compression ratio in four steps, from 2:1 to 12:1. Lower ratios compress audio over a wider dynamic range. Higher compression ratios are better for limiting purposes. The ratio control also changes the threshold. At lesser amounts of gain reduction, lower ratio settings will start compression sooner than higher ratios.

3. Power On/Off Switch

Turns the compressor On or bypasses the effect. Corresponds to the BP button in the AFX Rack.

4.Compression Meter

Displays the compression amount in dB.

5. Attack Control

Adjusts the Attack of the compressor. Slow Attack lets more initial transients through. Fast Attack tames peaks and sounds more aggressive.

6. Output Gain Control

Adjusts output gain. Match the Output gain to Input level or make-up lost volume due to gain reduction.

7. Release Control

Adjusts the compressor Release time. Slower settings retain more of the original dynamics. Faster settings add energy and density to the sound.

8. Output Gain Meter

Visualizes the output gain of the compressor.

5. Contacts

Having difficulties with Tube176 or anything else Antelope? Get in touch with us by the following means:
European Direct Support Line
+44 2039578550
10:00 a.m. – 10:00 p.m. (EET), Monday – Friday
USA Direct Support Line
+1 734 418 8661
7:00 a.m. – 6:30 p.m. (EST), Monday – Friday
Online (live chat and e-mail)
Antelope Audio Support Page

6. Glossary

Attack
Adjusts how quickly the compressor starts to work after the signal exceeds the compression threshold.
Release
Controls how soon the compressor will stop after the signal goes below the compression threshold.
Ratio
Controls how much compression is applied. For example, a 3:1 ratio means that every time the input signal crosses the threshold by 3dB, output signal will be attenuated 1dB.
Threshold
The Threshold is the level above which the compressor considers the signal too loud and starts applying compression.
Knee
Knee and Attack have a lot in common, but they are not the same. Like Attack, Knee controls how the compressor will react once input signal passes the threshold. Hard Attack makes the compressor engage immediately while Soft Knee shapes its attack time to make it slower and smoother.